Smoothing Odometry using Robot Localization
In this tutorial, we will discuss how various sources of odometry can be fused to provide a smoothed odometry using the robot_localization package and we will also show how to publish the odom => base_link transform using robot_localization.
The robot_localization package is used to provide a fused and locally accurate smooth odometry information from the data provided by N odometry sensor inputs. These information can be provided to the package through nav_msgs/Odometry, sensor_msgs/Imu, geometry_msgs/PoseWithCovarianceStamped, and geometry_msgs/TwistWithCovarianceStamped messages.
A usual robot setup consists of at least the wheel encoders and IMU as its odometry sensor sources. When multiple sources are provided to robot_localization, it is able to fuse the odometry information given by the sensors through the use of state estimation nodes. These nodes make use of either an Extended Kalman filter (ekf_node) or an Unscented Kalman Filter (ukf_node) to implement this fusion. In addition, the package also implements a navsat_transform_node which transforms geographic coordinates into the robot’s world frame when working with GPS.
Fused sensor data is published by the robot_localization package through the odometry/filtered and the accel/filtered topics, if enabled in its configuration. In addition, it can also publish the odom => base_link transform on the /tf topic. Do note that if you followed Setting Up Odometry - Gazebo, you will need to remove the /tf bridge in bridge_config.yaml to get the transforms from ekf_node instead of Gazebo.
See also
More details on robot_localization can be found in the official Robot Localization Documentation.
If your robot is only able to provide one odometry source, the use of robot_localization would have minimal effects aside from smoothing. In this case, an alternative approach is to publish transforms through a tf2 broadcaster in your single source of odometry node. Nevertheless, you can still opt to use robot_localization to publish the transforms and some smoothing properties may still be observed in the output.
See also
For more information on how to write a tf2 broadcaster, you can check Writing a tf2 broadcaster (C++) (Python).
For the rest of this section, we will show how to use robot_localization to fuse the sensors of sam_bot. It will use the sensor_msgs/Imu messages published on /demo/Imu and the nav_msgs/Odometry message published on /demo/odom and then it will publish data on odometry/filtered, accel/filtered, and /tf topics.
Configuring Robot Localization
Let us now configure the robot_localization package to use an Extended Kalman Filter (ekf_node) to fuse odometry information and publish the odom => base_link transform.
First, source your ROS 2 installation to set the environment variables:
source /opt/ros/<ros2-distro>/setup.bash
Then install the robot_localization package:
sudo apt install ros-$ROS_DISTRO-robot-localization
Next, we specify the parameters of the ekf_node using a YAML file. Create a directory named config at the root of your project and create a file named ekf.yaml. Copy the following lines of code into your ekf.yaml file.
### ekf config file ###
ekf_filter_node:
    ros__parameters:
# The frequency, in Hz, at which the filter will output a position estimate. Note that the filter will not begin
# computation until it receives at least one message from one of the inputs. It will then run continuously at the
# frequency specified here, regardless of whether it receives more measurements. Defaults to 30 if unspecified.
        frequency: 30.0

# ekf_localization_node and ukf_localization_node both use a 3D omnidirectional motion model. If this parameter is
# set to true, no 3D information will be used in your state estimate. Use this if you are operating in a planar
# environment and want to ignore the effect of small variations in the ground plane that might otherwise be detected
# by, for example, an IMU. Defaults to false if unspecified.
        two_d_mode: false

# Whether to publish the acceleration state. Defaults to false if unspecified.
        publish_acceleration: true

# Whether to broadcast the transformation over the /tf topic. Defaults to true if unspecified.
        publish_tf: true

# 1. Set the map_frame, odom_frame, and base_link frames to the appropriate frame names for your system.
#     1a. If your system does not have a map_frame, just remove it, and make sure "world_frame" is set to the value of odom_frame.
# 2. If you are fusing continuous position data such as wheel encoder odometry, visual odometry, or IMU data, set "world_frame"
#    to your odom_frame value. This is the default behavior for robot_localization's state estimation nodes.
# 3. If you are fusing global absolute position data that is subject to discrete jumps (e.g., GPS or position updates from landmark
#    observations) then:
#     3a. Set your "world_frame" to your map_frame value
#     3b. MAKE SURE something else is generating the odom->base_link transform. Note that this can even be another state estimation node
#         from robot_localization! However, that instance should *not* fuse the global data.
        map_frame: map              # Defaults to "map" if unspecified
        odom_frame: odom            # Defaults to "odom" if unspecified
        base_link_frame: base_link  # Defaults to "base_link" if unspecified
        world_frame: odom           # Defaults to the value of odom_frame if unspecified

        odom0: demo/odom
        odom0_config: [false, false, false,
                      false, false, false,
                      true, true, false,
                      false, false, true,
                      false, false, false]

        imu0: demo/imu
        imu0_config: [false, false, false,
                      false, false, false,
                      false, false, false,
                      false, false, true,
                      false, false, false]
In this configuration, we defined the parameter values of frequency, two_d_mode, publish_acceleration, publish_tf, map_frame, odom_frame, base_link_frame, and world_frame. For more information on the other parameters you can modify, see Parameters of state estimation nodes, and a sample efk.yaml can be found here.
To add a sensor input to the ekf_filter_node, add the next number in the sequence to its base name (odom, imu, pose, twist). In our case, we have one nav_msgs/Odometry and one sensor_msgs/Imu as inputs to the filter, thus we use odom0 and imu0. We set the value of odom0 to demo/odom, which is the topic that publishes the nav_msgs/Odometry. Similarly, we set the value of imu0 to the topic that publishes sensor_msgs/Imu, which is demo/imu.
To understand how robot_localization is configured and understand the reasoning behind the config have a look at Configuring robot_localization.
See also
For more advice on configuration of input data to robot_localization, see Preparing Your Data for Use with robot_localization, and Configuring robot_localization.
Launch and Build Files
Now, let us add the ekf_node into the launch file. Open launch/display.launch.py and paste the following lines before the return launch.LaunchDescription([ line.
robot_localization_node = Node(
    package='robot_localization',
    executable='ekf_node',
    name='ekf_filter_node',
    output='screen',
    parameters=[os.path.join(pkg_share, 'config/ekf.yaml'), {'use_sim_time': LaunchConfiguration('use_sim_time')}]
)
Next, add the following launch arguments within the return launch.LaunchDescription([ block.
launch.actions.DeclareLaunchArgument(name='use_sim_time', default_value='True',
                                            description='Flag to enable use_sim_time'),
Lastly, add robot_localization_node, above the rviz_node line to launch the robot localization node.
      robot_state_publisher_node,
      spawn_entity,
      robot_localization_node,
      rviz_node
])
Next, we need to add the robot_localization dependency to our package definition. Open package.xml and add the following line below the last <exec_depend> tag.
<exec_depend>robot_localization</exec_depend>
Lastly, open CMakeLists.txt and append the config directory inside the install(DIRECTORY...), as shown in the snippet below.
install(
  DIRECTORY src launch rviz config
  DESTINATION share/${PROJECT_NAME}
)
Build, Run and Verification
Let us now build and run our package. Navigate to the root of the project and execute the following lines:
colcon build
. install/setup.bash
ros2 launch sam_bot_description display.launch.py
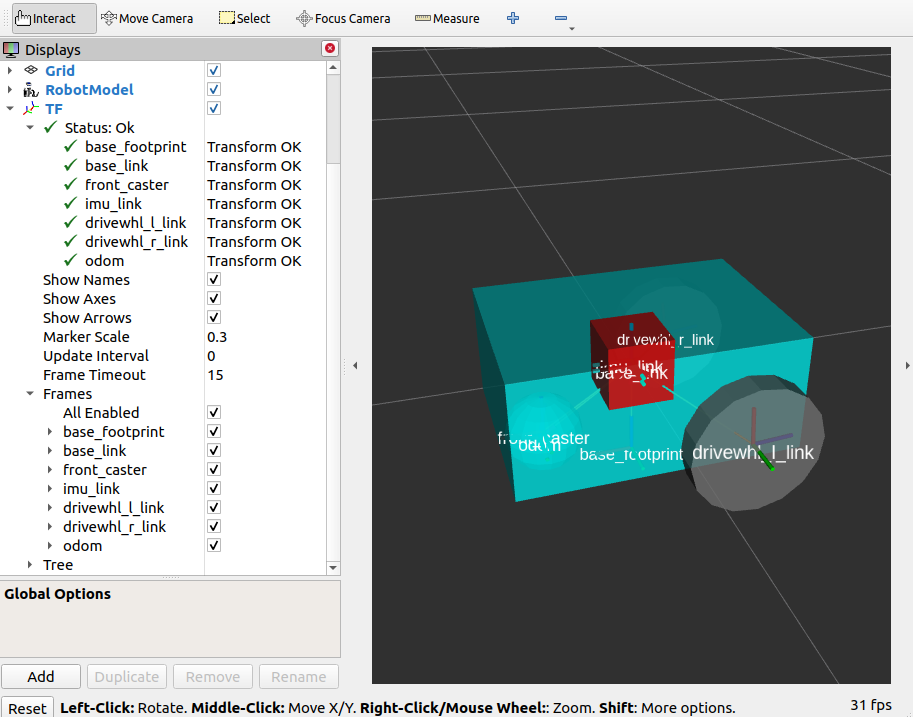
Gazebo and RVIZ should launch. In the RVIZ window, you should see the model and TF frames of sam_bot:
Next, let us verify that the odometry/filtered, accel/filtered, and /tf topics are active in the system. Open a new terminal and execute:
ros2 topic list
You should see odometry/filtered, accel/filtered, and /tf in the list of the topics.
You can also check the subscriber count of these topics again by executing:
ros2 topic info /demo/imu
ros2 topic info /demo/odom
You should see that /demo/imu and /demo/odom now both have 1 subscriber each.
To verify that the ekf_filter_node are the subscribers of these topics, execute:
ros2 node info /ekf_filter_node
You should see an output as shown below.
/ekf_filter_node
Subscribers:
  /demo/imu: sensor_msgs/msg/Imu
  /demo/odom: nav_msgs/msg/Odometry
  /parameter_events: rcl_interfaces/msg/ParameterEvent
  /set_pose: geometry_msgs/msg/PoseWithCovarianceStamped
Publishers:
  /accel/filtered: geometry_msgs/msg/AccelWithCovarianceStamped
  /diagnostics: diagnostic_msgs/msg/DiagnosticArray
  /odometry/filtered: nav_msgs/msg/Odometry
  /parameter_events: rcl_interfaces/msg/ParameterEvent
  /rosout: rcl_interfaces/msg/Log
  /tf: tf2_msgs/msg/TFMessage
Service Servers:
   ...
From the output above, we can see that the ekf_filter_node is subscribed to /demo/imu and /demo/odom. We can also see that the ekf_filter_node publishes on the odometry/filtered, accel/filtered, and /tf topics.
You may also verify that robot_localization is publishing the odom => base_link transform by using the tf2_echo utility. Run the following command in a separate command line terminal:
ros2 run tf2_ros tf2_echo odom base_link
You should see a continuous output similar to what is shown below.
At time 8.842000000
- Translation: [0.003, -0.000, 0.127]
- Rotation: in Quaternion [-0.000, 0.092, 0.003, 0.996]
At time 9.842000000
- Translation: [0.002, -0.000, 0.127]
- Rotation: in Quaternion [-0.000, 0.092, 0.003, 0.996]
Conclusion
In this guide we have discussed how multiple odometry sensors can be used to provide a filtered and smoothed odometry using robot_localization. We have also checked if the odom => base_link transform is being published correctly by robot_localization.