Dynamic Object Following
Nav2 provides two different approaches for dynamic object following tasks:
Following Server: A specialized server that handles dynamic object following with built-in recovery mechanisms and smooth control.
ComputePathToPose and FollowPath: A behavior tree-based approach using traditional navigation components for custom following behaviors.
Using Following Server
Following Server Overview
The Following server is a specialized server in Nav2 designed to handle dynamic object following tasks. It dynamically follows an object while maintaining a defined distance specified by the desired_distance parameter. The server abstracts away the complexities of tracking and following moving objects, allowing users to focus on higher-level navigation goals.
The FollowObject action can be called using two different input methods:
pose_topic: Topic to publish the pose of the object to follow. When using this method, the server subscribes to the specified topic of type
geometry_msgs::msg::PoseStampedcontaining the pose of the object to follow.tracked_frame: Target TF frame to follow. When using this method, the server directly follows the specified frame name using the transform tree.
The Following server uses the same controller as the Docking server, leveraging the SmoothControlLaw to generate velocity commands for smoothly following the target object. This ensures consistent and predictable motion behavior across Nav2’s specialized servers.
Recovery Mechanism: If the object becomes undetectable for a period of time (e.g., when the pose topic stops publishing), the server implements a recovery mechanism where the robot will rotate left and right in a search pattern until it relocates the target object.
Following Server Tutorial Steps
To use the Following server, you need to configure it in your behavior tree. This involves setting up the necessary action nodes and parameters to ensure smooth following behavior. The FollowObject action node provides two different approaches for object tracking.
Method 1: Using pose_topic
The simplest behavior tree for following a dynamic object using a pose topic is as follows:
<root main_tree_to_execute="MainTree">
  <BehaviorTree ID="MainTree">
    <FollowObject name="FollowPerson" pose_topic="/person_pose" max_duration="0.0"/>
  </BehaviorTree>
</root>
In this configuration:
pose_topic: Specifies the topic (/person_pose) wheregeometry_msgs::msg::PoseStampedmessages containing the object’s pose are publishedmax_duration: Duration to run the action (0.0 means indefinitely)
Method 2: Using tracked_frame
Alternatively, you can follow a specific TF frame directly:
<root main_tree_to_execute="MainTree">
  <BehaviorTree ID="MainTree">
    <FollowObject name="FollowPerson" tracked_frame="person_frame" max_duration="0.0"/>
  </BehaviorTree>
</root>
In this configuration:
tracked_frame: Specifies the frame name (person_frame) to follow using the transform treemax_duration: Duration to run the action (0.0 means indefinitely)
Additional Parameters
The FollowObject action supports additional parameters for fine-tuning:
desired_distance: Distance to maintain from the target object (in meters)detection_timeout: Time to wait without detecting the object before triggering recovery behaviorrotate_to_object_timeout: Maximum time allowed for the rotation recovery mechanism to find the objectstatic_object_timeout: Time threshold to determine if an object has been stationarysearch_by_rotating: Enable/disable the rotational search recovery mechanism when the object is lost
Recovery behavior is automatically activated when the target becomes undetectable, utilizing the search parameters above.
Following Server in Action
The following video demonstrates the Following Server functionality in a real-world scenario:
Using ComputePathToPose and FollowPath
ComputePathToPose Overview
This tutorial shows how to use Nav2 for a different task other than going from point A to point B. In this case, we will use Nav2 to follow a moving object at a distance indefinitely.
This task is useful in cases such as following a person or another robot. Below are some sample videos of applications that could be created using this capability. The “Carry My Luggage” RoboCup @ Home test, in which the CATIE Robotics team performs the test successfully and this real (future) world application:
The requirements for this task are as follows:
Changes are limited to the behavior tree used to navigate. This behavior tree can be selected in the
NavigateToPoseaction when required, or it can be the default behavior tree. It is made up of run-time configurable plugins.The configuration of the planner and the controller will not be modified.
The action will indefinitely run until it is canceled by who initiated it.
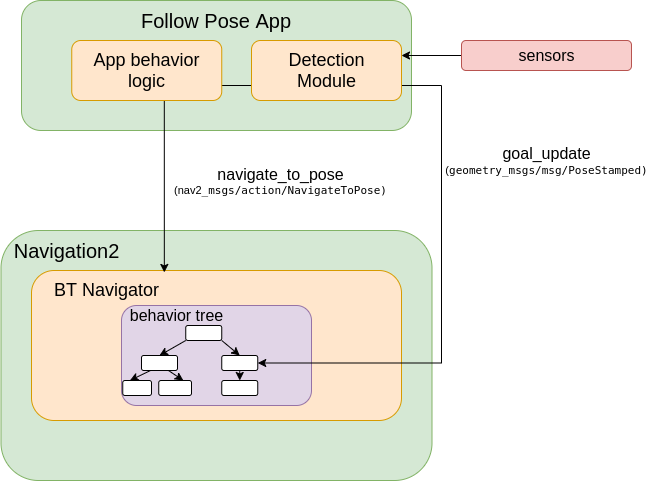
The detection of the dynamic object (like a person) to follow is outside the scope of this tutorial. As shown in the following diagram, your application should provide a detector for the object(s) of interest,
send the initial pose to the NavigateToPose action, and update it on a topic for the duration of the task. Many different types of detectors exist that you can leverage for this application:
ComputePathToPose Tutorial Steps
0- Create the Behavior Tree
Let’s start from this simple behavior tree. This behavior tree replans a new path at 1 hz and passes that path to the controller to follow:
<root main_tree_to_execute="MainTree">
  <BehaviorTree ID="MainTree">
    <PipelineSequence name="NavigateWithReplanning">
      <RateController hz="1.0">
        <ComputePathToPose goal="{goal}" path="{path}" planner_id="GridBased"/>
      </RateController>
      <FollowPath path="{path}" controller_id="FollowPath"/>
    </PipelineSequence>
  </BehaviorTree>
</root>
First, let’s make this behavior run until there’s a failure. For this purpose, we will use the KeepRunningUntilFailure control node.
<root main_tree_to_execute="MainTree">
  <BehaviorTree ID="MainTree">
    <PipelineSequence name="NavigateWithReplanning">
      <RateController hz="1.0">
        <ComputePathToPose goal="{goal}" path="{path}" planner_id="GridBased"/>
      </RateController>
      <KeepRunningUntilFailure>
        <FollowPath path="{path}" controller_id="FollowPath"/>
      </KeepRunningUntilFailure>
    </PipelineSequence>
  </BehaviorTree>
</root>
We will then use the decorator GoalUpdater to accept updates of the dynamic object pose we’re trying to follow. This node takes as input the current goal and subscribes to the topic /goal_update. It sets the new goal as updated_goal if a new goal on that topic is received.
<root main_tree_to_execute="MainTree">
  <BehaviorTree ID="MainTree">
    <PipelineSequence name="NavigateWithReplanning">
      <RateController hz="1.0">
        <GoalUpdater input_goal="{goal}" output_goal="{updated_goal}">
          <ComputePathToPose goal="{updated_goal}" path="{path}" planner_id="GridBased"/>
        </GoalUpdater>
      </RateController>
      <KeepRunningUntilFailure>
        <FollowPath path="{path}" controller_id="FollowPath"/>
      </KeepRunningUntilFailure>
    </PipelineSequence>
  </BehaviorTree>
</root>
To stay at a certain distance from the target, we will use the action node TruncatePath. This node modifies a path making it shorter so we don’t try to navigate into the object of interest. We can set up the desired distance to the goal using the input port distance.
<root main_tree_to_execute="MainTree">
  <BehaviorTree ID="MainTree">
    <PipelineSequence name="NavigateWithReplanning">
      <RateController hz="1.0">
        <Sequence>
          <GoalUpdater input_goal="{goal}" output_goal="{updated_goal}">
            <ComputePathToPose goal="{updated_goal}" path="{path}" planner_id="GridBased"/>
          </GoalUpdater>
         <TruncatePath distance="1.0" input_path="{path}" output_path="{truncated_path}"/>
        </Sequence>
      </RateController>
      <KeepRunningUntilFailure>
        <FollowPath path="{truncated_path}" controller_id="FollowPath"/>
      </KeepRunningUntilFailure>
    </PipelineSequence>
  </BehaviorTree>
</root>
Now, you may save this behavior tree and use it in our navigation task.
For reference, this exact behavior tree is made available to you batteries included in the nav2_bt_navigator package.
1- Setup Rviz clicked point
We are going to use RViz instead of a full application so you can test at home without finding a detector to get started. We will use the “clicked point” button on the toolbar to substitute object detections to provide goal updates to Nav2. This button allows you to
publish coordinates in the topic /clicked_point. This point needs to be sent to the behavior tree, using the program clicked_point_to_pose, from this repo. Clone
this repo in your workspace, build, and type in a terminal.
ros2 run nav2_test_utils clicked_point_to_pose
Optionally, you can remap this topic in your rviz configuration file to goal_updates.