Lidar-Free, Vision-Based Navigation
In this tutorial, you’ll see how to use the NVIDIA Jetson, Isaac ROS, Isaac Perceptor, and NVIDIA Nova technologies to implement Vision-based Navigation entirely without the use of LIDARs, active depth sensors, or other range-providing modalities. Instead, we’ll rely solely on passive stereo cameras as the extrinsic sensing source to achieve collision avoidance, localization, and mapping — a powerful and cost-effective alternative. The scripts and resources used can be found in open-navigation/opennav_visual_navigation.
This tutorial will guide you through the fundamental concepts behind vision-based navigation, explain how to configure and launch a vision-enabled Nav2 stack, and culminate in a hardware demonstration of a mobile robot performing autonomous security patrols.
Whether you’re developing for resource-constrained embedded systems or exploring alternatives to expensive sensor suites, this walk-through provides a complete introduction to deploying advanced autonomous navigation with only vision-based perception using a NVIDIA Nova reference platform, including stereo cameras and Jetson AGX Orin.
Note
While vision-based solutions offer powerful and efficient capabilities they can face challenges in certain environments. Scenarios involving glass surfaces, featureless corridors, thin obstacles, sudden movements, vibrations, or prolonged stillness under changing lighting conditions may impact performance. It’s important to thoughtfully evaluate whether a visual navigation approach aligns with the specific demands and conditions of your application to ensure the best results.
Preliminaries
This tutorial assumes that you have an NVIDIA Jetson - such as the Orin NX or AGX Orin - and stereo camera sensor(s) compatible with the Nova reference platform. This tutorial will make use of the Jetson AGX Orin powering the Segway Nova Carter robot built in collaboration with NVIDIA for vision-based navigation tasks. However, another Jetson product may suffice depending on the GPU compute demands placed on it by the number of cameras, resolutions, and models being run. Applying these technologies to a non-Nova design is possible using the general concepts and designs in this tutorial, however it involves a great deal of unique development as the launch files and nodes provided by NVIDIA assume this.
Additional Resources
Concepts
Navigation is performed by combining sensor data map(s) of the environment, and task intent to successfully move a robot to a final destination. Major elements of this include Path Planning, Control, Perception, Localization, and the Autonomy system to pull them all together. If you want to learn more about Navigation, checkout Navigation Concepts.
The elements that make use of sensor data are Perception and Localization. Planning and Control make use of derivative information from these subsystems, such as the robot’s current pose or information about the location of potential obstacles, but not the direct data itself. Structures like the environmental model fuses sensor data from many sensors together into a representation that is data agnostic, which can be used for planning and control algorithms to make decisions based off of. In Nav2, that is commonly the Costmap package, but could be height maps, voxel grids, and so on.
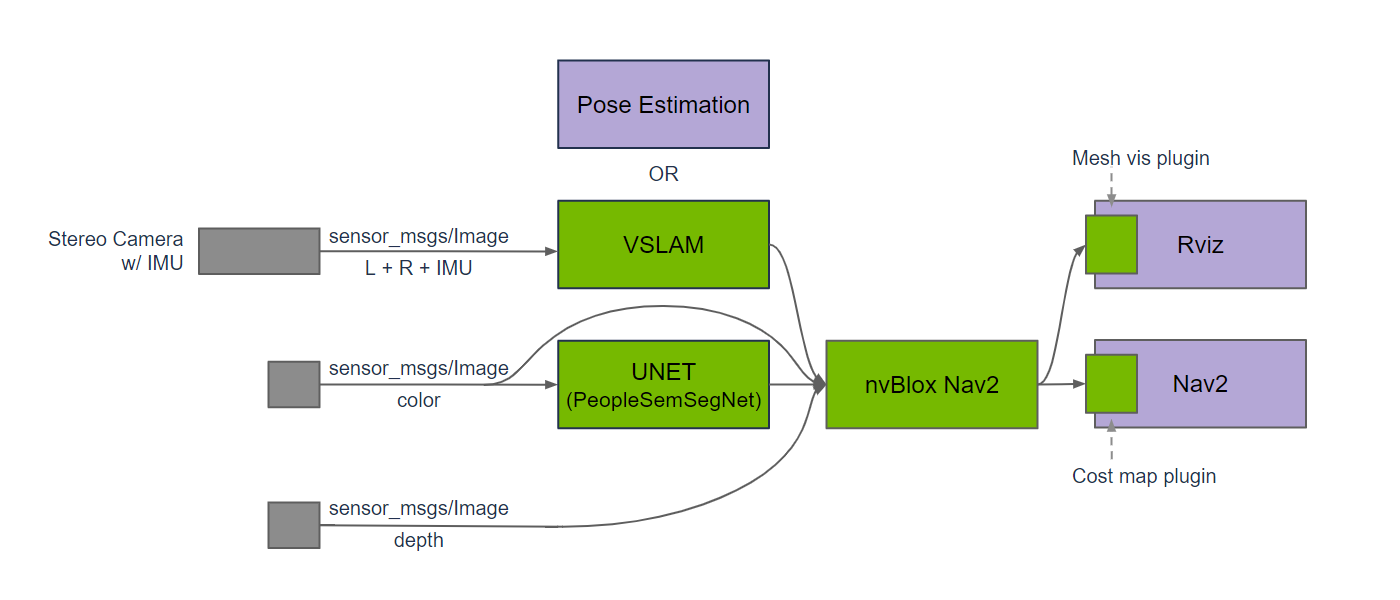
Thus, for Visual Navigation, there are two major areas which need adjustment from Lidar and Depth-based navigation into Vision-based navigation: Perception and Localization. We must replace the existing solutions for the following with Vision-based systems:
Data Acquisition: Compute disparity information and derived results from stereo camera information
Data Fusion: Combine multiple camera feeds into an environmental model for use in planning and control
Mapping: Creating a globally-consistent view of the environment using camera data
Localization: Using a globally-consistent view of the environment to later localize the robot within during task execution
Currently, these are solved in Lidar-based solutions using Costmap2D, a SLAM library like SLAM Toolbox or Cartographer, and a global localizer like AMCL.
NVIDIA Technologies
NVIDIA provides the necessary technologies to replace the existing Lidar-based navigation solutions. This is made possible by leveraging the power of NVIDIA’s GPU and the Isaac ROS & Perceptor SDKs.
Data Acquisition:
Depth acquisition with Lidar- and Depth-based sensors is relatively straight forward. For the majority of cases, a ROS driver will connect to the sensor and provide the depth data in a standard format like a Depth Image or PointCloud2. Sometimes post-processing is needed to remove noise or other artifacts to improve later 3D reconstruction.
In the Vision-based navigation, we instead require more stages to obtain both the sensor data and derived results needed for 3D reconstructions to build the environmental model required for global path planning and local trajectory planning (control).
Data is first acquired via the Jetson’s libargus or a sensor manufacturer provided library to obtain sensor data in a low-latency, time-synchronized way to enable accurate information for Visual mapping and localization purposes.
This is key for good performance of a vision-based solution and many sensors are supported.
The disparity is then estimated using Isaac’s isaac_ros_ess, which computes a GPU accelerated, deep-learning based stereo disparity image.
Finally, isaac_ros_stereo_image_proc converts the disparity image into a Depth Image used for later 3D reconstruction.
Note
isaac_ros_stereo_image_proc may also compute a PointCloud2 as well if an application calls for pointcloud rather than depth image format.
Data Fusion:
Once we’d obtained the depth information from the stereo pair, we can use this for environmental model construction and updates so we can leverage knowledge about the environment to make intelligent planning and control choices. While definitionally 3D Reconstruction methods may not require depth information from camera feeds, most modern and robust solutions require it, hence the need for the Isaac SDK’s depth estimation pipeline.
NVIDIA provides a great 3D Reconstruction solution called NvBlox.
NvBlox is a GPU accelerated signed-distance field library which can be used to generate environmental models using voxel grids.
This can take in multiple depth images from stereo camera pairs and populate a 3D environmental representation.
It can also accept an optional semantic segmentation mask to detect people, robots, or other dynamic objects in the scene to remove them from the environmental model’s update. These dynamic obstacles are then later re-inserted at the end of the update to avoid artifacts in environmental updates related to dynamic obstacles without the need of expensive clearing logic. Common demonstrations show this with a particular human segmentation model, but any model may be used trained to segment out any number of object classes.
Note
It may be necessary to regenerate these models in advance of doing any visual navigation or data collection/data fusion for visual navigation. See Troubleshooting section for details on common error messages and their solutions.
The NvBlox model is hosted inside of the Costmap2D package as a Costmap Layer Plugin used to update the occupancy grid model for use in planning and control. Future updates to Nav2 may make it possible to use 3D environmental models natively rather than reducing dimensionality for use-cases that require 3D collision checking like mobile manipulation and traversibility estimation.
This removes the need to work with a Voxel Layer, Spatio-Temporal Voxel Layer, Obstacle Layer, or other sensor processing layers to mark and clear data from the occupancy grid.
Mapping:
Mapping is crucial for long-term planning to understand the environment and know how to navigate from a given point to any other point in a space most optimally. While short-term navigation tasks with immediate visibility of the space may not require a pre-built map, most practically deployed applications require either (1) time-optimal execution and cannot get lost attempting to navigate down incorrect areas that will not lead to a solution or (2) operate in large spaces where the target poses are not commonly visible from current sensor data to establish a route to the goal.
cuVSLAM is used for visual SLAM (VSLAM) to create and save a map of the environment from sensor data. This is a pure visual mapping solution that uses only stereo camera images and IMU data to map the environment using stereo feature matching. Due to the computational demands of the mapping process on moderately large spaces, this is completed offline from a teleoperated data collection run. This fully replaces 2D, 3D, or other types of Lidar-SLAM.
Localization:
cuVSLAM is also used for run-time pure localization within the feature map generated during the mapping run.
This can run in excess of 30 fps with 4 stereo camera pairs, or even faster with fewer on the Jetson AGX Orin.
Additionally, a utility that Isaac ROS SDK provides, Visual Global Localization (cuVGL), is used to identify the initial starting pose in a localization run when one is not already previously known. Using the features at the initial pose, it will match those with the pre-built map to identify the starting pose one-time on startup before continuing the localization session with cuVSLAM - solving the kidnapped robot problem. This will be used to set the initial pose of the robot before starting navigation sessions. It may also be used to relocalize the robot during runtime as well, which can be run in just under 1 second.
0. NVIDIA Jetson Setup
Jetpack
If you don’t already have the latest jetpack installed follow the instructions below. The current version at the time of writing is Jetpack 6.2 with Isaac 3.2.
If the Jetson is currently running Jetpack 6.0 or higher, please use this guide to upgrade using apt to Jetpack 6.2. Otherwise, the NVIDIA SDK Manager is required to upgrade, either as a docker image or debian to run on a developer computer.
Note
Be sure to have the Jetson’s USB-C port used for bootloading accessible if upgrading using the SDK Manager. Use the IP addresses of this wired connection, not over a local WAN.
Nova Init
If not already setup, make sure to install and configure Nova Init using the following instructions.
Power Modes
If not already setup in Max Power Mode, we recommend you do so now to be able to leverage the full power of the Jetson.
Power Mode settings are accessed and controlled with the nvpmodel command and the CPU/GPU clock settings are controlled via jetsonclocks. The following commands will set the Jetson to Max Power Mode with the CPU/GPU clocks set to maximum performance as well.
Set CPU/GPU clocks to maximum: sudo /usr/bin/jetson_clocks
Set Max Power Mode for power consumption: sudo nvpmodel -m 2
Confirm settings by running: sudo /usr/bin/jetson_clocks --show|tail -1 and sudo /usr/bin/nvpmodel -q|head -1
Details on power consumption, CPU/GPU frequencies, cooling fan speeds, etc. can be found at https://docs.nvidia.com/jetson/archives/r35.1/DeveloperGuide/text/SD/PlatformPowerAndPerformance/JetsonOrinNxSeriesAndJetsonAgxOrinSeries.html
Users with a power constrained application, should consider which power setting make most sense for your power resources, compute requirements, and application duration. Revisit this after the demonstration to optimize for your requirements and power needs.
Compatible Cameras
There are several cameras that are compatible with this workflow. We recommend the Stereolabs ZED cameras for their native integration with the NVIDIA ecosystem and ease of use. Stereolabs also provides a powerful SDK of Vision and Spatial AI features which can be further leveraged to increase the functionality and intelligence of a vision-based mobile robot. However, stereo cameras from Leopard Imaging are also compatible and supported.
Cameras with tight integration and synchronization are required to work with cuVSLAM due to its timing constraints to achieve accurate results. Thus, we recommend using one of these compatible options. However, if you’d like to use NvBlox without cuVSLAM and using another localization and mapping solution, a broader range of camera options are available such as the Realsense. NvBlox uses the pose estimates that cuVSLAM provides, but those pose estimates can be from any source. It uses these pose estimates to place the sensor data in the scene to populate the environmental model. NvBlox can work well on just a single stereo camera, but cuVSLAM typically requires two or more cameras to see enough of the scene to obtain robust results.
1. Initial Setup
First, we need to set up a Isaac ROS Dev environment using Docker, as highly recommended by NVIDIA.
Tooling Setup
This can be run as a single block of commands or one at a time in a Linux shell:
sudo systemctl daemon-reload && sudo systemctl restart docker
sudo apt install git-lfs
git lfs install --skip-repo
mkdir -p  /mnt/nova_ssd/workspaces/isaac_ros-dev/src
echo "export ISAAC_ROS_WS=/mnt/nova_ssd/workspaces/isaac_ros-dev/" >> ~/.bashrc
source ~/.bashrc
This sets up Git LFS (large file storage) for downloading weights and files stored in the Isaac ROS source repositories.
It also creates a developer workspace isaac_ros-dev either on an externally mounted SSD or on the local computer.
It is recommended to use an externally mounted SSD or NVME drive to have sufficient storage to run this demonstration.
For an external drive, use echo "export ISAAC_ROS_WS=/mnt/nova_ssd/workspaces/isaac_ros-dev/" >> ~/.bashrc
If one is not available or you are using a large(>1TB) internal drive change the line to echo "export ISAAC_ROS_WS=/home/${USER}/workspaces/isaac_ros-dev/" >> ~/.bashrc
This sets an environmental variable ISAAC_ROS_WS which is used to mount the workspace to the Isaac ROS containers and in other Isaac workflows, so it is important to always have that set.
Note
The NVIDIA Jetson Orin and Jetson Xavier family system have an M.2 Key-M(AKA 2280) slot which provides support for an onboard NVME SSD drive. The NVIDIA SDKManager install tool has configuration options to flash a Jetpack image to this drive, providing high-capacity storage at PCIe speeds without the need for an external drive or MicroSD card.
Make sure the rosbag for mapping and the output occupancy grid map directories are mounted to the docker container. You can add them in ${ISAAC_ROS_WS}/src/isaac_ros_common/scripts/.isaac_ros_dev-dockerargs then restart the container:
echo -e '-v /mnt/nova_ssd/recordings:/mnt/nova_ssd/recordings' > ${ISAAC_ROS_WS}/src/isaac_ros_common/scripts/.isaac_ros_dev-dockerargs
echo -e '-v /mnt/nova_ssd/maps:/mnt/nova_ssd/maps' > ${ISAAC_ROS_WS}/src/isaac_ros_common/scripts/.isaac_ros_dev-dockerargs
Next, we’re going to clone the isaac_ros_common package which contains key elements of Isaac ROS, including the dockerfiles and scripts needed to run Isaac in the Dev environment.
cd ${ISAAC_ROS_WS}/src && git clone -b release-3.2 https://github.com/NVIDIA-ISAAC-ROS/isaac_ros_common.git
If working with a Nova Carter device, do the following as well to setup the docker configs.
Demonstration Setup
We’re now ready to launch the container, we can do so via:
cd ${ISAAC_ROS_WS}/src/isaac_ros_common && ./scripts/run_dev.sh
Once we’ve obtained and setup Isaac, we can add in the opennav_visual_navigation project as a starting point.
# Clones the project and creates a colcon_ws relative to your path
cd ${ISAAC_ROS_WS}/src && git clone git@github.com:open-navigation/opennav_visual_navigation.git
2. Software & Workflow Walkthrough
The demonstration leverages the Nova Carter robot, so the hardware is brought up using the nova_carter_bringup launch file navigation.launch.py and teleop.launch.py which launches the robot hardware and other nodes needed for the demonstration.
This has been preconfigured with Nav2, Isaac Perceptor, and is highly integrated with the Nova reference platform.
Please reference this package for more information.
To adapt to another platform, make a new my_robot_nav package which:
Launches the robot hardware drivers for accepting commands, bringing up sensors, providing transformation tree, etc
Launches Isaac Perceptor, usually via
isaac_ros_perceptor_bringuppackage’sperceptor_general.launch.pyorperceptor_rgbd.launch.pyLaunches Nav2 with the appropriate configurations (i.e. removed AMCL for cuVSLAM, Costmap configurations for NvBlox)
Use these launch files to replace nova_carter_bringup/launch/navigation.launch.py used in this package.
The demonstration is setup to utilize the front, left, and right stereo cameras for localization with VSLAM and 3D reconstruction using NvBlox using live use. While the rear camera would also provide useful information (and is also used during the VSLAM mapping dataset), it adds additional computation beyond what the AGX Orin can handle in real-time with the present Isaac release. This may be improved at a future time or when using newer Jetson platforms such as the Thor. The 2D and 3D lidars are disabled and not used anywhere in this work.
3. Initial Environment Mapping
Data Collection
The first step is to generate a dataset to create the VSLAM map during offline processing. When working in realistically large spaces, this cannot be done on the Jetson in real-time, so it is necessary to teleoperate the robot for the initial mapping session rather than completed in real-time.
Tips and Tricks:
Start datasets with 10 seconds at the starting pose before moving the robot so it may be used in the future for localization testing
Teleop the robot into a clear space before starting recording, ensure it is not docked and the cameras are not obstructed by a wall, furniture, etc. This ensures the starting data will contain features that can be processed later.
For each 5x5m area, drive for around 1 minute
Drive in closed loops and make sure to capture data at more than one angle (i.e. drive in different directions to obtain different viewpoints)
Don’t drive for a long time in a straight line, weave and swerve.
There’s a technique to making a good VSLAM map, it might take you a few tries to get good results.

When ready, inside of the docker image from before, run the following and joystick your robot through the space:
ros2 launch isaac_ros_nova_recorder nova_recorder.launch.py \
    config:=nova-carter_hawk-4_imu \
    headless:=True
This will launch the isaac_ros_nova_recorder node, which wraps isaac_ros_data_recorder, and a teleop node from the nova_carter_bringup package. You can also launch the recording from the provided convenience script in the host environment: ./scripts/run_docker_nova_recorder.sh
Note
The config parameter is used to specify the set of sensors to use during mapping. The nova-carter_hawk-4_imu config uses only the 4 stereo cameras in the front of the Nova Carter robot, plus the onboard IMU. If you do not have the Hawk cameras or wish to use other sensors, you can check out the other configs under /etc/nova. Using additional sensors will result in a larger rosbag2 recording and could result in a significantly longer post-processing time.
More details on the available configs can be found here:
Follow the guidelines outlined above and begin to drive the robot around the space. In the example above the nova_carter_recorder node will begin recording stereo images from the Hawk cameras integrated into the Nova Carter robot. Data will be stored in the /mnt/nova_ssd/recordings directory by default as a rosbag2 (MCAP) file. See the full nova_carter_recorder tutorial at https://nvidia-isaac-ros.github.io/repositories_and_packages/isaac_ros_nova/isaac_ros_nova_recorder/index.html for details on other command-line arguments that will allow storage of the mapping run to Amazon S3, etc. When you have sufficiently mapped the area, remembering to do loop closures, hit CTRL-C in the terminal you launched the recording from.
The loop closure technique for mapping the space.
When you are done you should see a directory contain the MCAP file(s) in /mnt/nova_ssd/recordings like this:
nvidia@carter-v24-nav2:/mnt/nova_ssd/recordings$ ls -l
total 5612708
drwxr-xr-x  2 root   root         4096 Sep 14 18:15 2025-09-15_01-07-21_rosbag2
drwxr-xr-x  2 root   root         4096 Sep 16 10:14 2025-09-16_17-13-45_rosbag2
drwxr-xr-x  2 root   root         4096 Sep 16 10:25 2025-09-16_17-14-57_rosbag2

[...]
Be aware that the recording files can be quite large, even for a short run:
nvidia@carter-v24-nav2:/mnt/nova_ssd/recordings$ du -ah -d 1 2025-09-16_17-14-57_rosbag2
16K     2025-09-16_17-14-57_rosbag2/metadata.yaml
18G     2025-09-16_17-14-57_rosbag2/2025-09-16_17-14-57_rosbag2_0.mcap
18G     2025-09-16_17-14-57_rosbag2
nvidia@carter-v24-nav2:/mnt/nova_ssd/recordings$
Data Processing
After the dataset has been collected, it must be processed to generate the cuVSLAM map for localization and cuVGL map used for initial global localization. It can be done via ./tools/create_map.sh <PATH_TO_ROSBAG> <PATH_TO_OUTPUT_FOLDER>. For example using the recommended directories:
export LD_LIBRARY_PATH="/workspaces/isaac_ros-dev/ros_ws/isaac_ros_assets/models/dnn_stereo_disparity/dnn_stereo_disparity_v4.1.0_onnx/plugins/aarch64/:$LD_LIBRARY_PATH"

ros2 run isaac_mapping_ros create_map_offline.py --sensor_data_bag=/mnt/nova_ssd/recordings/<RECORDED_BAG_NAME> \
    --base_output_folder=/mnt/nova_ssd/recordings/maps \
    --print_mode all --steps_to_run edex,cuvslam,cuvgl
Warning
Starting with version 4.1.0 of the isaac-ros-ess code, the plugin architecture was changed to allow for custom plugins. This means you need to explicitly provide the path to the plugins for the models you’ve installed, even if they are the default ones provided by NVIDIA.
For the dnn_stereo_disparity models, installed as part of the isaac-ros-ess-install-models package, this looks like:
export LD_LIBRARY_PATH="/workspaces/isaac_ros-dev/ros_ws/isaac_ros_assets/models/dnn_stereo_disparity/dnn_stereo_disparity_v4.1.0_onnx/plugins/aarch64/:$LD_LIBRARY_PATH"
Not setting this will cause the depth and occupancy_map generation steps to fail.
When finished, you should see something like the output below:
nvidia@carter-v24-nav2:/mnt/nova_ssd/recordings/maps$ ls -l 2025-11-13_04-02-21_2025-11-13_02-54-48_rosbag2/
total 68
drwxr-xr-x  5 nvidia nvidia  4096 Nov 13 16:55 cuvgl_map
drwxr-xr-x  2 nvidia nvidia  4096 Nov 12 23:11 cuvslam_map
drwxr-xr-x 10 nvidia nvidia  4096 Nov 12 23:16 edex
drwxr-xr-x  2 nvidia nvidia  4096 Nov 13 00:40 logs
drwxr-xr-x  2 nvidia nvidia  4096 Nov 12 23:12 poses
nvidia@carter-v24-nav2:/mnt/nova_ssd/recordings/maps$
This step may take some time(up to several hours depending on the length of your recording) and will use the full compute power of the Jetson. It is recommended to not have other workloads on the Jetson while this is processing.
Final results
Once all the scripts have run to completion, your final directory contents should look something like this:
nvidia@carter-v24-nav2:/mnt/nova_ssd/recordings/maps$ ls -l 2025-11-13_04-02-21_2025-11-13_02-54-48_rosbag2/
total 68
drwxr-xr-x  5 nvidia nvidia  4096 Nov 13 16:55 cuvgl_map
drwxr-xr-x  2 nvidia nvidia  4096 Nov 12 23:11 cuvslam_map
drwxr-xr-x 10 nvidia nvidia  4096 Nov 12 23:16 edex
drwxr-xr-x  2 nvidia nvidia  4096 Nov 26 00:40 logs
drwxr-xr-x  4 nvidia nvidia  4096 Nov 12 23:21 map_frames
-rw-r--r--  1 nvidia nvidia    93 Nov 26 00:40 metadata.yaml
-rw-r--r--  1 root   root   17267 Nov 26 01:07 occupancy_map.png
-rw-r--r--  1 root   root     134 Nov 26 01:07 occupancy_map.yaml
drwxr-xr-x  2 nvidia nvidia  4096 Nov 12 23:12 poses
nvidia@carter-v24-nav2:/mnt/nova_ssd/recordings/maps$
Explanation:
cuvgl_map- Contains Visual Global Localization database used with thecuvslam_mapincluding Visual Bag Of Words(VBOW) data, etc.cuvslam_map- Contains VSLAM mapedex- camera intrinsics and frame metadatadepth- depth maps generated by isaac_ros_dnn_stereo_disparity DNN models and the ESS pluginmap_frames- recorded camera topic data broken out into individual frames on a per-camera basis, including raw and depth images.poses- pose database
We see that in addition to the populated map directories, we have an occupancy_map.png and occupancy_map.yaml file. These will be useful for the point-to-point VSLAM navigation. The YAML file should reference the PNG file and look like a typical 2D ROS map metadata file:
image: "occupancy_map.png"
mode: "trinary"
resolution: 0.05
origin: [-20.8, -16, 0]
negate: 0
occupied_thresh: 0.65
free_thresh: 0.25
Let’s take a look at the occupancy_map.png file itself:
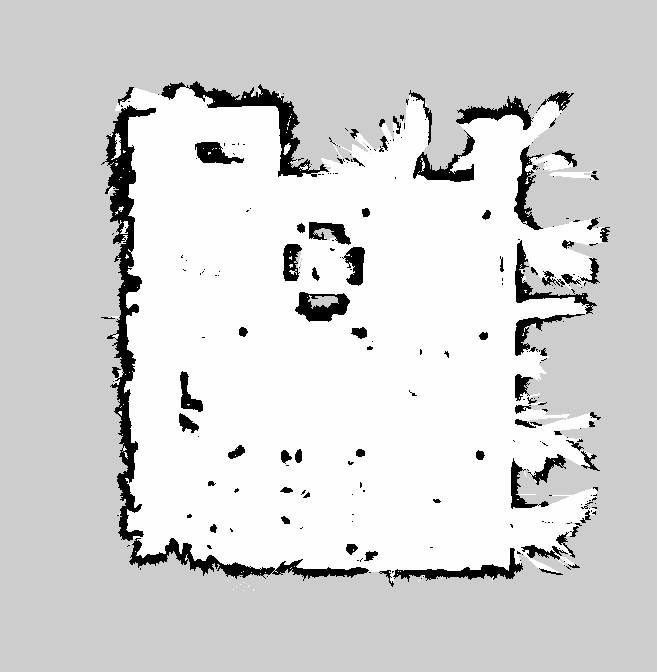
We’ll note that this lacks the typical fine detail we’re used to seeing from a LIDAR-generated occupancy grid map. This is an artifact of image data being converted to depth data and highlights the importance of using the loop-closure techniques mentioned above when recording the visual data. Despite appearances, this map is quite sufficient for visual navigation around the space. The occupancy map is really only one layer in the whole localization stack used by the robot during visual navigation. Isaac ROS Perceptor will also use the cuvslam_map, cuvgl_map and live image data from the cameras on the robot for localization against features in the mapped space.
4. Navigation Testing
Now that this initial setup is complete, we’re ready to start navigating using visual localization and collision avoidance!
Simply run the main demonstration launch file and see it in action!
ros2 launch opennav_visual_nav_demo visual_nav_demo_launch.py
Note
This wraps the larger command:
ros2 launch nova_carter_bringup perceptor.launch.py use_foxglove_whitelist:=false stereo_camera_configuration:=front_left_right_configuration disable_vgl:=False vslam_load_map_folder_path:=$vslam_dir vgl_map_dir:=$vgl_dir occupancy_map_yaml_file:=$occupancy_map_path vslam_enable_slam:=True
Running this will require the user to attach to the container from a separate terminal and run:
ros2 launch nav2_bringup navigation_launch.py
to launch Nav2. NVIDIA provides its own VSLAM stack, so Nav2 is not launched by default.
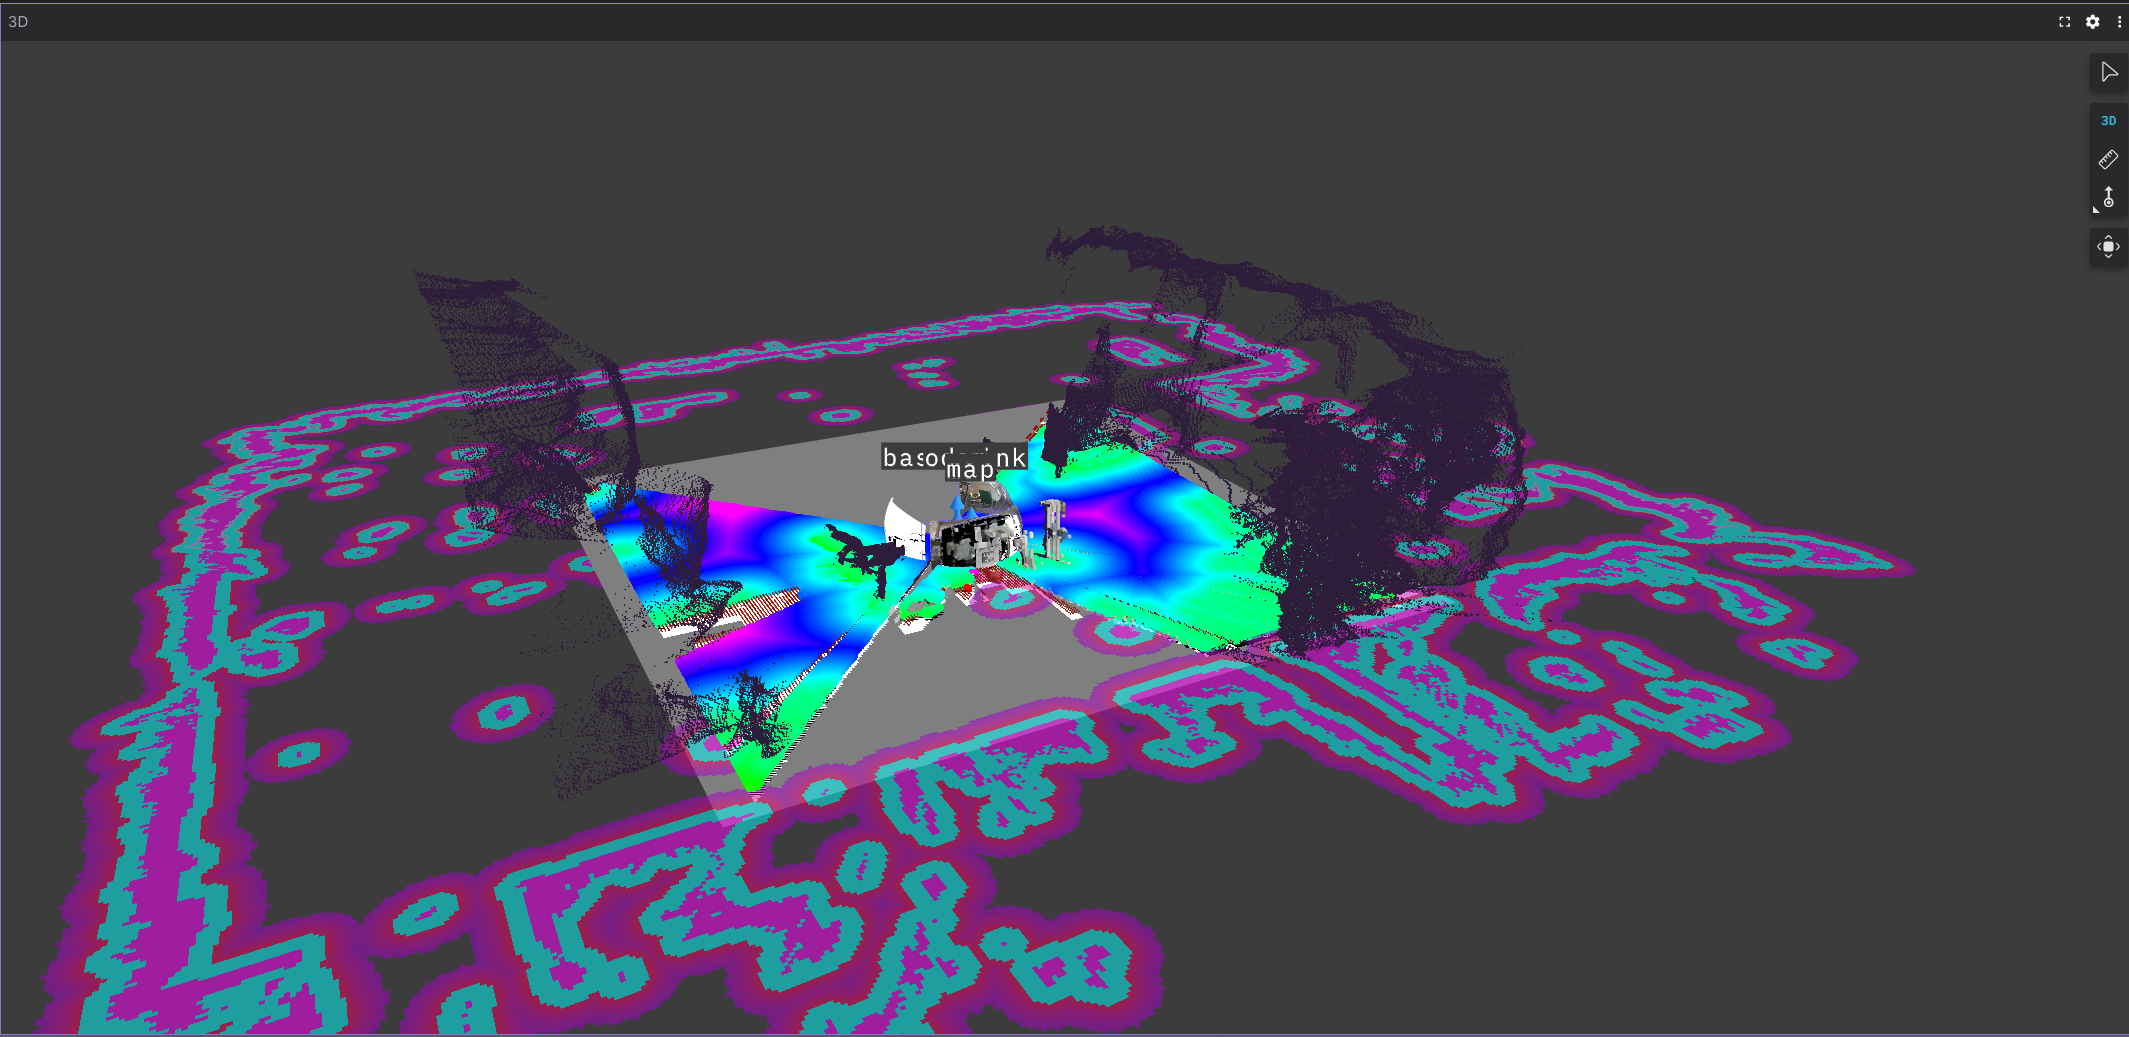
You should now see something like this in Foxglove Studio:
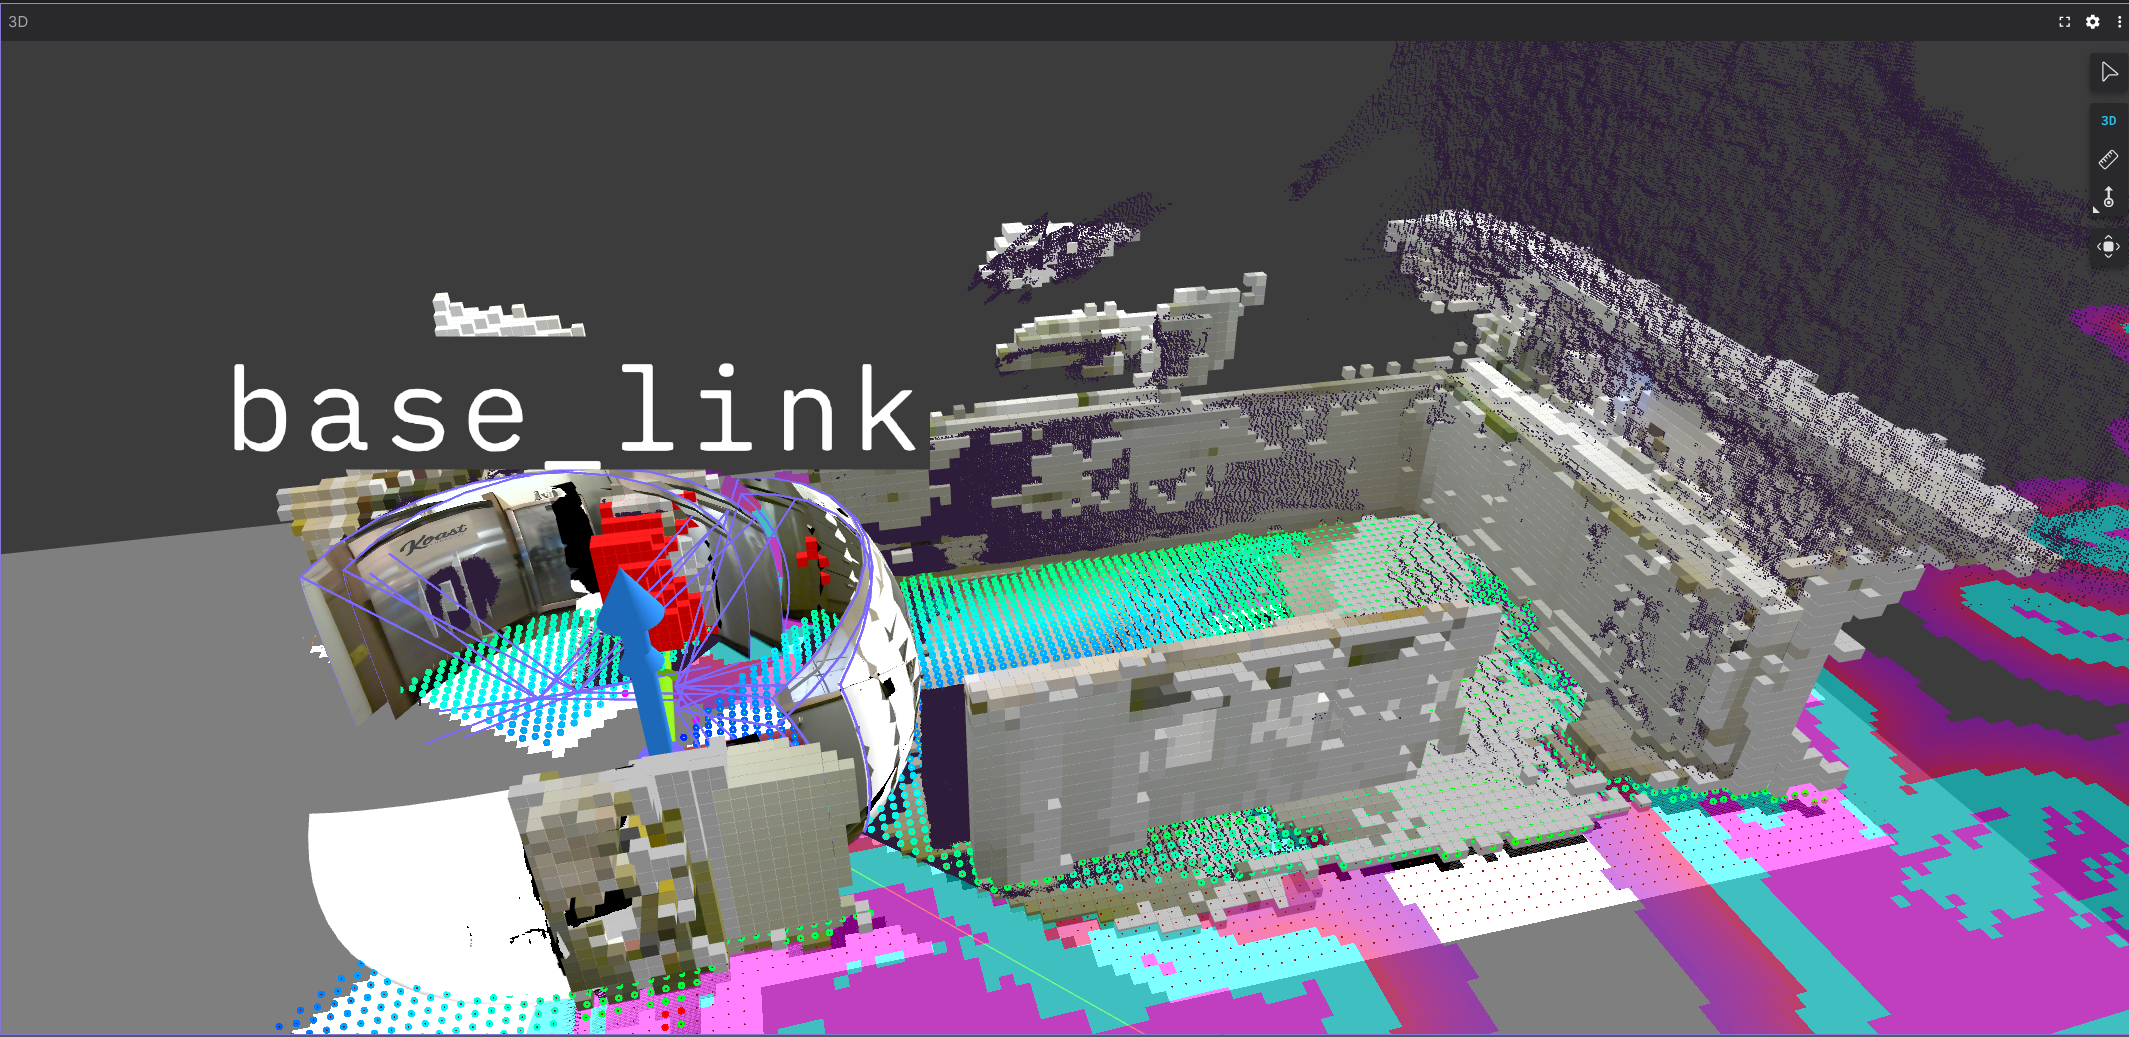
And be able to now navigate as shown in the video below! A special thanks to Nav2 Sponsor Polymath Robotics for allowing us to use their space over the holidays to perform these demonstrations.
5. Conclusions & Extensions
In this tutorial, we showed how Nav2 can be used without lidar or depth cameras to conduct vision-only navigation leveraging NVIDA’s technologies (Jetson, Isaac ROS, Isaac Perceptor, Nova reference platform). To leverage even more vision features during Visual Navigation, you can also use the Isaac SDK, ZED SDK, or other AI technologies to leverage the GPU for:
Object detection or semantic segmentation:
isaac-ros-peoplenetandisaac-ros-peoplesemsegnetfor person recognition and semantic segmentation of people from mapped spaces.Ground or freespace segmentation
Explore other VSLAM, VIO, or 3D Mapping technologies
Resources
More detailed information can be found in the following documentation:
Related GitHub repositories can be found here:
https://github.com/NVIDIA-ISAAC-ROS/isaac_ros_mapping_and_localization
https://github.com/NVIDIA-ISAAC-ROS/isaac_ros_visual_slam/tree/main
https://github.com/NVIDIA-ISAAC-ROS/isaac_perceptor/tree/main/isaac_ros_perceptor_bringup
More demonstrations can be found here:
Troubleshooting
Isaac Perceptor API Usage Errors
Error Code 6: API Usage Error (The engine plan file is not compatible with this version of TensorRT, expecting library version 10.7.0.23 got...
This error occurs when the packages on the Nova Carter host install are different from those installed on the Docker container, specifically the TensorRT and nvblox packages. More specifically, this often occurs because the Nova Carter JetPack install provides 10.3.x versions of TensorRT(tensorrt,nvinfer,etc.) and the development Docker containers use 10.7.x
See Rebuilding TensorRT Engine for Isaac Perceptor on Nova Carter for a step-by-step guide to fix this error.
Error Code 4: API Usage Error
This error should be avoided as part of the engine regeneration solution to the Error Code 6: issue. In case it still occurs, the problem is related to how trtexec generated the new .engine and .plan file.
By default trtexec will generate a “lean” .engine runtime model. A “full” runtime model is necessary for the dnn_stereo_disparity node to run successfully.
Library Path Errors
ess_engine_x.so: No such file or directory
This is a Library pathing problem on the Docker container that isaac_ros_mapping may throw.
In the Docker startup/entrypoint script, set LD_LIBRARY to include the $ISAAC_ROS_WS/isaac_ros_assets path as part of LD_LIBRARY_PATH or prepend it to the launch script when processing data recorded by isaac_nova_recorder. A one-line fix for this error looks like:
LD_LIBRARY_PATH="/workspaces/isaac_ros-dev/ros_ws/isaac_ros_assets/models/dnn_stereo_disparity/dnn_stereo_disparity_v4.1.0_onnx/plugins/aarch64/:$LD_LIBRARY_PATH" \
ros2 run isaac_mapping_ros create_map_offline.py \
--sensor_data_bag=/mnt/nova_ssd/recordings/<PATH_TO_RECORDED_DATA>/ \
--base_output_folder=/mnt/nova_ssd/recordings/maps/
This has also been observed to affect depth and occupancy map generation, with the resulting error as the isaac_ros_dnn_disparity
Troubleshooting map generation
By default the ./tools/create_map.sh script may fail to generate all stages of the map for a number of reasons. If this crashes repeatedly for you, one workaround is to generate the map data needed for VSLAM piecewise.
If, for example, you are running into errors generating the depth and occupancy_map data, you can skip around these and generate the cuvgl and cuvslam assets like so:
ros2 run isaac_mapping_ros create_map_offline.py --sensor_data_bag=/mnt/nova_ssd/recordings/<path_to_recorded_bag_file>/ \
--steps_to_run edex cuvslam map_frames cuvgl
If you wanted to pick up the process using the existing data and (re)generate the cuvslam dataset you could run:
ros2 run isaac_mapping_ros create_map_offline.py --sensor_data_bag=/mnt/nova_ssd/recordings/<path_to_recorded_bag_file>/ \
--map_dir=/mnt/nova_ssd/recordings/maps/${EXISTING_MAP_DIR}/ --steps_to_run cuvslam
Similarly, to run the depth step by itself, the command-line would be:
export LD_LIBRARY_PATH="${ISAAC_ROS_WS}/isaac_ros_assets/models/dnn_stereo_disparity/dnn_stereo_disparity_v4.1.0_onnx/plugins/aarch64:$LD_LIBRARY_PATH"

ros2 run isaac_mapping_ros run_ess_ros_offline.py \
 --image_dir=/mnt/nova_ssd/recordings/maps/${EXISTING_MAP_DIR}/map_frames/raw \
 --output_dir=/mnt/nova_ssd/recordings/maps/${EXISTING_MAP_DIR}/map_frames/depth \
--frames_meta_file=/mnt/nova_ssd/recordings/maps/${EXISTING_MAP_DIR}/map_frames/raw/frames_meta.json
The occupancy_map generation step can be run with this command:
ros2 run isaac_mapping_ros create_map_offline.py \
--sensor_data_bag=/mnt/nova_ssd/recordings/${BAG_DIR} \
--base_output_folder=/mnt/nova_ssd/recordings/maps \
--map_dir=/mnt/nova_ssd/recordings/maps/${EXISTING_MAP_DIR} \
--print_mode all --steps_to_run occupancy
Most of the tools used by ./tools/create_map.sh can be found in the Docker container under /opt/ros/humble/lib/isaac_mapping_ros and run individually if necessary:
root@carter-v24-nav2:/opt/ros/humble/lib/isaac_mapping_ros# ls -l
total 7080
-rwxr-xr-x 1 root root  100512 Jul 10 00:17 camera_frame_selection
-rwxr-xr-x 1 root root  112816 Jul 10 00:17 copy_image_dir_main
-rwxr-xr-x 1 root root    7099 Jul 10 00:15 create_cuvgl_map.py
-rwxr-xr-x 1 root root   17072 Jul 10 00:15 create_map_offline.py
-rwxr-xr-x 1 root root  116912 Jul 10 00:17 decode_video
-rwxr-xr-x 1 root root  121016 Jul 10 00:17 mapping_pose_to_rosbag
-rwxr-xr-x 1 root root 5233656 Jul 10 00:17 optimize_vo_with_keyframe_pose_main
-rwxr-xr-x 1 root root   67680 Jul 10 00:17 rosbag_poses_to_tum_format
-rwxr-xr-x 1 root root 1129064 Jul 10 00:17 rosbag_to_mapping_data
-rwxr-xr-x 1 root root   18543 Jul 10 00:15 run_ess_ros_offline.py
-rwxr-xr-x 1 root root   43304 Jul 10 00:17 run_nvblox
-rwxr-xr-x 1 root root    4001 Jul 10 00:15 run_rosbag_to_mapping_data.py
-rwxr-xr-x 1 root root  112856 Jul 10 00:17 select_frames_meta
-rwxr-xr-x 1 root root  141512 Jul 10 00:17 update_keyframe_pose_main
root@carter-v24-nav2:/opt/ros/humble/lib/isaac_mapping_ros#
These are covered extensively in the NVIdia tutorial https://nvidia-isaac-ros.github.io/reference_workflows/isaac_perceptor/tutorial_mapping_and_localization.html#creating-maps